This series has been a long time coming. I have been struggling with continuous integration and continuous development for a while and I want to share my process, techniques, and tips and tricks with you.
I will publish several blog posts about this process because we cannot go through all of it at once. It would lead to a TL;DR article that nobody will read.
- The first part will be setting up the project/solution for your database.
- The second part will be about creating unit tests for your database objects.
- The third part will be to put the project through a build server and eventually a deployment server
Why this series
I never had to do a lot of work with source control, visual studio, and all the related parts because I would get a script, and deploy it in a test. If it worked fine, if not I would have a backup and restore that.
That was my previous process and works on some level. But when you have to deal with rapid development, things start to break.
In my current job, there is another problem. I’m both the DBA and, for most database projects, also the developer.
That means I wear two hats when developing and deploying my solutions. That’s like I’m marking my paper and it’s always approved. I don’t want that responsibility and reliability so things have to change.
The last reason I think this is important is that I like to automate everything. Automation prevents human errors and makes out lives easier.
In the end, I only want to work on a project, push the changes to source control, let some service build the objects, and push it along without me having to interfere.
Setting up the project
This part has taken a considerable amount of time for me to switch over to.
For me to switch over from the SQL Server Management Studio (SSMS) to having to deal with Visual Studio (VS) was like night and day.
The thing is that when you’ve never worked with VS a lot you kind of have to find your way around it.
The SSDT projects are different from say a C# project and it all feels a bit big. I assure you, if you’re going to switch over, that feeling is only going to be there in the beginning.
I’m going to help you set up your project in mere minutes instead of the hours I had to put into it. The first thing I wanted to do is set up my project.
I wanted to separate the model from the tests in separate projects but within the same solution. The following post helped me a lot and was glad about the framework.
I did change a couple of things to make things run smoothly in the end. Setting up this framework every time is going to be a pain but I was not going to spend all that time setting up database projects.
Fortunately, my good friend Friedrich/Fred Weinmann (t | g ) has created a few commands that make it possible to create templates. not just files, but also entire folders. This was the solution to my problem. I set up the solution in such a way that it would automatically generate the right files with the right names.
Fred helped make the final changes under the hood to dot all the i’s.
Generating the solution
There are a couple of things you need to have installed before you can generate the SSDT solution.
- Install the PowerShell module PSModuleDevelopment
- Download the SSDT solution
- Generate the template locally
Install PSModuleDevelopment
Open a PowerShell window and enter the following command
Install-Module PSModuleDevelopment -Scope CurrentUser
Download the SSDT solution
I have created the SSDT solution for you so you don’t have to. Go to the repository and download the files. If you have Git installed, go to your preferred location to download the content and execute the following command
git clone https://github.com/sanderstad/SSDT-With-tSQLt-Template.git
You can also download the zip file manually from the Github repository. When you download the zip file, unpack it in your preferred location.
Generate the template
For you to be able to generate the solution you have to create the template on your computer first. This only needs to be done once and you can reuse it every time. Execute the following command to create the template
New-PSMDTemplate -ReferencePath \[path-you-downloaded-the-files-to\] -TemplateName \[name-for-the-template\]
For example
New-PSMDTemplate -ReferencePath C:\\Temp\\SSDT-With-tSQLt-Template\\ -TemplateName SSDTWithtSQLt
After that, you no longer need the files and you can remove them if you like. The last step is the most exciting one, generating the solution.
Execute the following command to generate the solution based on your just-created template
Invoke-PSMDTemplate -TemplateName \[name-of-the-template\] -OutPath \[path-to-output-to\] -Name \[your-solution-name\]
For example
Invoke-PSMDTemplate -TemplateName SSDTWithtSQLt -OutPath "C:\\Temp\\" -Name DBProject
Navigating to the solution it will look something like this:

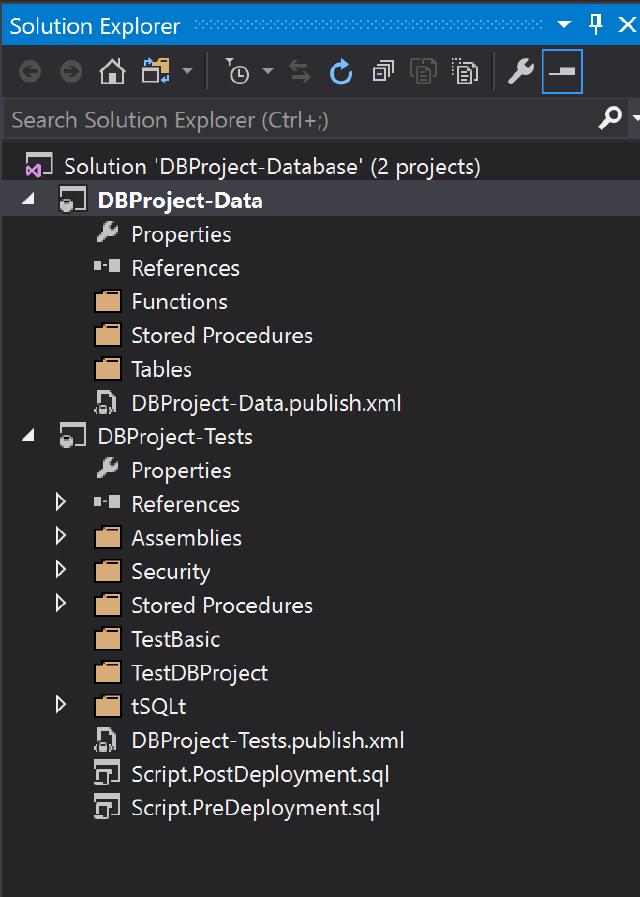
Opening the solution this is what you’ll have

Now you’ll be able to generate your SSDT projects, including all the content needed for unit testing in mere minutes.
